Thursday, December 20, 2012

Mini Cowboy Band Outfit: How I Did It

CBB Uniform Details
Secret: I actually made two bodysuits. The first became too small for her, so after homecoming I made a second bodysuit to use for Halloween.  The first run had felt for the patch and neckerchief, the second used purple fabric from an old tshirt.  Felt doesn't really sew on well, so I glued those things. When I went to make the second outfit I couldn't unstick them so I made a second set out of fabric and sewed it to the new bodysuit.  That is why you will see glue/stitch in several places.
 
Bodysuit
  1. purchased youth small shirt from craft store (couldn't find appropriate colored bodysuit)
  2. altered using current size bodysuit for comparison, neck stretched enough I didn't change it
  3. Used fabric marker to draw pockets, button placket, collar fold
  4. attached stiff quilting fabric for collar
  5. glued buttons to front and sewed on snaps at crotch
  6. made patch and neckerchief from felt/fabric and glued/sewed on
 
Patch
 
Looked at original patch and cut fabric in Texas shape
Used fabric paint/markers to draw symbols on matching original layout/style; this was freehand since the patch was smaller to fit such a tiny outfit.
Let dry, then glued/stitched on.
 
Chaps
 
  1. Purchased scrap leather, felt, and sequins from craft store
  2. Cut scrap leather to appropriate shape.
  3. Hand-stitched sequins onto felt to spell Hardin on one panel and Simmons on the other.
  4. Glued felt to leather as the leather I had was to thick to try to sew it. So, tacky glue to the rescue.
  5. I also cut small fringe pieces from a leather cord I had and glued them just under the edge of the felt. That took a bit of time, but it gave a more finished look.
  6. Let dry overnight.
  7. Made an elastic belt, covering with brown fabric I had on hand. If you do this, make sure your fabric is as long as you want the elastic to be able to stretch otherwise it defeats the purpose.
  8. Sewed a "buckle" from yellow fabric scraps and stitched it to the belt.
  9. Folded chap panels over the belt and glued leather to leather.
 
It was relatively easy, but each part took some time because I wanted to be pretty precise.  I worked on it over the course of several weeks, but overall probably only spent about 5-10 hours.
 
Have fun!



Tuesday, December 18, 2012

Catching Up

I know I've been absent for a long while. There is a good reason. Life. It happens so fast and I am so tired that by the time I think about putting something on here I'm 3 months behind and realize it's silly to bother. Well, it's not silly, but sometimes it feels that way.
So, a brief picture update of our life.

Our daughter met the cat.
(She's become mobile, almost walking full time.)
They instantly fell in love.
She now squeals with delight every time she sees TJ.

We dressed her up as a mini Cowboy Band gal for HSU homecoming and again for Halloween.
She had boots but they didn't stay on long because it was hot.
(She's getting stronger willed.)

Here is a look at the back of her "uniform"
(She interacts more and seems to understand our instructions, but doesn't always follow them.)

We had Thanksgiving and are getting ready for Christmas.
Oh, and we are now gearing up for her 1st birthday in January!
Wow did that happen fast.
It has been an amazing rollercoaster ride of love and joy.

Maybe you'll see more from me if time allows in the next few weeks.

Merry Christmas!


Friday, October 12, 2012

Wait...What?!?


Nine Months Ago
 

My little baby hit the 9 month mark yesterday. Yep, nine months old!


It's amazing to me how quickly the time has gone.  She is crawling, standing, trying to walk, and talking. She has her daddy's adventurous/mischievous nature and her momma's grace, or lack there of.  It's quite a combination.  She climbs over every barrier we can fashion and often bangs her head on the floor during the tumble that follows, but she's resilient. She usually just gets up and tries again.

We love watching her learn, and today I had the biggest surprise of all.  She spoke.  Not just the lovely babbling mumbles she's been doing for the last few months, but a real sentence.  In fact, two of them. Wait....WHAT?!?  Yeah, you read that right.  My little Lila said two sentences to me in direct response to questions I asked her. They were short, but it was still amazing.

When she woke up this morning, she had her regular diaper change/bottle while lounging across mom routine.  Afterward, she was standing on my lap fully awake and happy, but gassy.  After several rather large toots I asked her "Does that feel better?"  She looked at me for about half a second then said, "It does!" So I kind of half laughed in shock and amazement, then decided to keep going.  I asked, "Did you sleep well?" She responded, "I did!" It was incredible.  After that I started getting the normal dadada babble as she tried to tell me a story, but she said those two responses plain as day. Who's a proud mama?  This gal.

Then, as we were saying bye to Daddy and getting ready to leave Ryan asked her teasingly "Is Amanda Dodson your dad?" It's a joke he thinks is funny to use my maiden name and say I'm the dad and he's the mom.  I tell him not to because she'll get confused, but when he asked that she turned to me and said "Momma, Momma."  Melt my heart. :) It was intentional, deliberate, thought out, and not because she was feeling bad. The few times she's ever said Momma have been when she really was upset and didn't feel well.  This was an excited expression, not a whiny one.  It was wonderful. And then, of her own volition, without any prompting(we've been trying to teach her bye-bye and waving for about two months) she said "buh beh bye bye" to her Daddy.  When I asked her to say bye bye again and wave she gave me a look as if to say, "Didn't you just hear me? What do I have to do woman? Do you need a sign?  Hello!! I JUST SAID THAT!" Lol...it was a very long, very pointed look.

I am so proud of my little one. She's growing so fast, and expressing what she learns more every day.

One Week Ago
Talking to me while I took a picture before school.


We thank you Lord for choosing us to be caretakers, protectors, and guides for her soul on this earth.  We are blessed to have her and ask your guidance as we train her up in your truth and love.  Amen.


Tuesday, October 2, 2012

Paint Chip Calendar

I decided to make some tutorials for a craft party we hosted about a month ago. One of our items was a paint chip calendar.  This would be great for a monthly plan ahead menu board, chore chart, or even general memo board.  I had all these supplies on hand, but if you don't they are pretty easy to find in a big box store like Wal-Mart or Target, or you can improvise/substitute too.
 
 Gathered my supplies;
Old frame
Paint Chips
Craft Paint
Small Paint Brush
Scissors/Exacto Knife
Black Marker


First, I took the glass out of the frame and painted the frame black. 
While you have the glass out of the frame, go ahead and clean it really well.


Also, don't drop the freshly painted frame on your carpet/rug.
 Fortunately for me I was planning on getting rid of this anyway, and it cleaned up okay for the most part.

Next, I cut my paint chips to size, leaving six "boxes" along the length.
 
 The cardboard you see was already inside the frame.  If your frame doesn't have a cardboard back you can use, just cut a stiff piece of cardstock or cardboard from a box.

Next I tried to figure out spacing for the width.
 This was a bit tricky for me to just eyeball, and it ended up a little less than perfect, but it still works.

Before I glued the paint chips down I ran a black marker along the edges for definition.


Here you can see where I got really messy.

 So I made my lines a lot thicker to cover it up.
 Glued it all down and wrote the days on top, then put it back in the frame.

Now we can use dry erase markers on the glass,
At our craft party several people alternated colors or put the light/dark going opposite ways.  Make it your own and enjoy!


Tuesday, September 25, 2012

Button Crafts


See this?  Yeah, I made that!

 I love crafting, and I especially love making crafty things to give as gifts. So, when I found out my friends Abby and Cody were expecting a baby I knew what I wanted to do.  I made up a little gift basket of things a new mommy and daddy should probably have but rarely get at baby showers, and threw in some fun little extras for mom, and then got to work on this little crafty bit.  It took me almost 6 months to get it finished, but only because other things kept getting in the way.

 I gathered my supplies of canvas(I previously painted the background and letter), tacky glue, and buttons.  LOTS of buttons! Oh, and a pair of tweezers to pick up/place buttons with glue, and a paper towel for wiping off excess glue on the tweezers every so often.

 Next I separated buttons into glass bowls by color groups and started arranging them on the canvas to see what looked good.  BEFORE gluing, and after talking to my husband(his opinion is very important in all color decisions), we decided the green/blue combo wasn't going to pop enough, and we knew Abby really likes bright colors.

So, I started playing with pinks, oranges and yellows.  It was looking pretty good, and I decided to add the other colors to the background for something extra.  We liked the look of the greens, blues, and purples against the bright orange, pink, and yellow. 

Then came the gluing....lots and lots of gluing! It took about 2-3 hours probably but those were distracted hours of tv watching and baby chasing too. I glued each button individually, grabbing it with the tweezer, putting a drop of glue on the back and carefully placing them each back on the canvas.  The glue seeps through the holes, and sometimes squishes out the sides, but it dries clear so it's not a big deal. Just let it dry flat or you'll be seeing some droopy buttons and drippy bits.


The initial trial gave us an idea of what it would look like color wise, but I decided we needed to build the letter up a bit more so I just kept layering and building out around the letter.

And this was the final product.  I see where I could have added/built up a little more in some areas, but it turned out really cute regardless.  We were so excited to give it to our friends to decorate their nursery for their little one, and they loved it too.  I've done another one recently on a picture frame, but I think I like the canvas better.  So, go out and try it!  It's fun, and cute, especially if you have colorful buttons like these. Also, you could do a shape instead of a letter.  I outlined my letter so I had a basic guide to follow, but if you don't want to you can just eyeball it.

Materials; 
8"x8" canvas
craft paint and brush for background
Buttons:about 200, all different sizes and colors
(got mine at Wal-Mart in color coordinated packages)
Tacky Glue
Tweezers
Small cloth to wipe excess glue from tweezers

Time: Roughly 2 hours start to finish
Dry time: Overnight 
(Lay flat to dry or you will have droopy letters and drippy bits)

Happy crafting!!


Tuesday, September 11, 2012

Baseball and ....Cake?


You know that cake ball craze that's been going on for a few years? 
No?
 Well, head on over to Pinterest, or Google Images, and type in cakeballs, or cake balls, and you will be inundated with images of overly cute edible goodness.


I've made cake balls on several occasions and most people really like them because they are small, generally cute, and semi-portable. I decided this would be a great option for my husband's 30th birthday celebration which was outside.  I stuck a lollipop stick for extra portability so we wouldn't need plates and forks.  We had a baseball themed party and this is what I came up with;

Now, I'll be the first to admit they aren't perfect, but aren't they adorable!?!
This is on the wax paper while we decorated them. See the end for a final look!

My homemade baseball Happy Birthday Banner. Click the picture to zoom in and see the detail. Oh, and note the extra brown grass...welcome to Texas in July! 


 Mom grilling hot dogs. Quintessential baseball food.


My husband admiring trying to decide which flavor he wants. 
His sister helped me decorate them, and we put printed baseball lollipop signs to let everyone know what flavors we had. The baseball design was lemon cake and we made a chocolate drizzled design that was pineapple cake.
It was so much fun, and even though the 'stitching' took some time I'd still do it again. 
Everyone loved it and we had a great party. 


Tuesday, September 4, 2012

New Art

I totally made this!
*Note: I just found this post and apparently never published it. Oops.  It should have been posted around this time last year, but hey...better late than never right? Right.  So, check it out.*

Saw the idea on Pinterest...and decided we'd try it for the nursery.  It was actually messier than I anticipated, but relatively easy to do and we are really thrilled with the results.  It now has a home in the nursery :)
If you decide to try this be aware; 1. lining up the crayons so they are straight is more difficult than you'd think. 2. Make sure you use a hair dryer that blows perfectly straight out (see all the crazy splatters going diagonally across the canvas?...yeah, they also went on the walls) 3. Cover the area you are working in REALLY well (see note 2.)  The hair dryer I used had a tendency to blow multiple directions causing hot wax to fly off the canvas and on the bathroom wall, floor, counter, mirror, my hand and foot, the rug...Most of it cleaned up pretty easily except for the textured wall.  Fortunately I was able to do a quick touch up with craft paint over those spots so you can't see it.  We will end up painting the bathroom again at some point because it needed a second coat anyway.  But, be warned...hot wax is HOT. :) 

I used an old canvas I had laying around and had to paint over something, but taking time to paint the canvas, pick out colors, line them up, glue the crayons down and melt the wax it probably only took me 1-2 hours which is pretty good.  Cleanup took a little bit, but would have been much better if I'd thought ahead a little more.

So, Happy Crafting!


Wednesday, August 8, 2012

Rugs for the win!

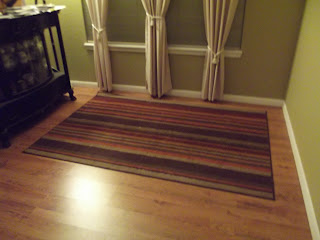
So, remember when I posted about my new rug from RugsUSA.com?
Yeah, I still haven't taken an updated picture to show the finished dining room. More on that to come. But see my pretty new rug?

 
Well, I was thinking about getting another one like it for our living room, but was putting if off because I didn't want to spend the money(even though it's really cheap compared to anywhere else).  Today I opened my email, and guess what?  The Groupon Goods Deal is for RugsUSA.com(among other things)!!! 
YAY!
So, I'll be purchasing that rug I wanted and another one for a bedroom, all while spending less than I originally intended to spend on just the one rug. Very excited!  All that said, you should definitely hop on over to Groupon.com and buy your voucher, then go pick out your rugs, lamps, or furniture at RugsUSA.com.  :) 


*This is not a paid advertisement.  Groupon.com and RugsUSA.com have no idea who I am.  I just want you to have the same thrill I did to redecorate on a dime.  After all, sharing is caring.


**********UPDATE**********
Please note that you can't combine promotions. 
That being said, I still got an amazing deal!
I bought the same rug(almost 8'x10') I got for the dining room to put in the living room at $82, and a cute runner(will post pics later) for the hallway at $46. 
With the cost of my groupon and the $8 over the promotion amount, I spent $63 total(NO SHIPPING or TAX costs), which is still less than I paid($65.60) for the first rug I bought with a 20% discount from the website. 
Needless to say, I'm quite thrilled! Now, just to wait the week or so until the beauties arrive on my doorstep.


Friday, July 6, 2012

Rug Update

Before

5'x7'
$10 find
NEVER liked.
Bought because we needed something fast.
It's dark, and I never cared for it much.
We moved the table before I took this picture.  It was scooted up to the window and piled up with junk. We rarely used it and it drove me nuts! You can see a small amount of the junk piled on the china hutch.
Yuck!
Honestly, the rug isn't horrible, but I didn't like it for this space.  I'll show you what I ended up doing with it later.

After
7'6" x 9'6"
$65
LOVE
Bought because:
*Appeals to my love of both traditional and contemporary styles.
*Fits the space.
*Price. About the only thing better would be free.
It's just a tad too long to go the other direction, but other than that if fits the space great!
I'm still cleaning a bit, but you can see we rearranged the room completely.  I cleared off the china hutch and put it in front of the window- I know it's a no-no, but we hardly ever open those blinds because it just looks out at a fence.  This opened the room up so much and now it feels a little more like an actual dining space instead of a junk catcher.  I think it will help curb our tendency to pile bills and other junk on the china hutch since it's away from the front door now.
I'll put up a better picture once I get the room in better order.

Yay for change!


Tuesday, June 26, 2012

Biscuit Waffles


So. Good.

These waffles are crispy, easy, cute, and can be frozen easily.

What do you need?

1-2 cans of your favorite biscuits
I used the cheap kind that are small
Buttermilk or Homestyle work really well
1 waffle iron
butter, syrup, or honey, and other favorite toppings

I have a four square waffle iron, so I place one biscuit in each square.  It cooks them through and makes wonderful little round waffles that are crisp on the outside.  Perfect with a little butter and honey or syrup or whipped cream and fresh strawberries.  OR if you are feeling especially like you need to splurge just put them all on top. :)  Super easy and hardly any cleanup.

Friday, June 22, 2012

Changing things up a bit

See this beautiful rug? She'll be in my home next week! SO EXCITED!!!

I can barely contain myself as I type this.  Also, I have a huge grin on my face for finally buckling down and getting something for our dining room.  I've been rug shopping for the last 5+ years and never found what I wanted at a reasonable price.   Usually I'll find something that makes me giddy and it will end up being $400 or more, which is WAY out of my price range. My biggest problem is not knowing what I really want because I like traditional and contemporary both.  This gives me the best of both I think.  I know it might look a little plain, but I'm super excited for it to get here and go under our dining room table.

Where did I find the beauty pictured above you ask? Well, have you heard of RugsUSA.com? They don't know who I am, this isn't a paid advertisement. I learned about them through Thrify Decor Chick. HOLY COW!!! Gorgeous rugs, and great prices! Not only do they have about a bajillion rugs to choose from, they have MANY price points and styles. So, if you are in the market for a new rug...go look, and if you aren't in the market for a new rug go look anyway. You might change your mind. They almost always have free shipping, and they let you pay through PayPal or Amazon. That's a big plus for me because a.) I love shopping online-it's so much easier than schlepping through the store with baby in tow and I can compare multiple items in a matter of minutes instead of days or this case years, and b.) I don't like putting my credit card information into sites I'm unfamiliar with. But I frequently use Amazon- every two to three weeks at least, and use PayPal when possible with other sites.

To give you an idea why I needed a change;
This is similar in color to what we have now, except ours isn't really this nice looking.  I found it for about $5-10 and have never liked it.  It's too small for the space and is very dark.  It makes me annoyed and sad everytime I look at it.  Also, it has a broken corner that sticks up a few inches no matter what I do to try to get it to lay flat.  Needless to say...we needed a change.  I'll post a before/after once the new rug comes in.

Go...find a new rug....they have zebra stripes, chevrons, flowers, seisals, orientals, and even guided play rugs like a race track or city scape. If nothing else it's fun to just see what's out there.


Tuesday, June 19, 2012

Craft Time

This is what I have to show for my weekend.

 
In truth it was a very productive weekend and a great Father's Day. 
I just don't have many pictures to show you how much I accomplished. 
Actually, this is the first crafty thing I've really gotten to do since my daughter was born, but I'm pleased as punch!  I found these blocks at the dollar store and the colors were really aweful, so I painted them.  They are headed for her shelf tonight.

If you want to do this you just need some craft paint.
I painted the colored bits white first, then used the colors.

Yay!

Friday, April 27, 2012

Updated the Mural!


Click here to view these pictures larger

I decided I needed to be represented!  We already had the daddy owl and the baby owl, now mommy has an owl too.

Thursday, April 12, 2012

Oops

Remember how I said I was back?  Obviously I lied.  Oopsy.  It wasn't intentional.  I promise.  Blogging takes time though.  Were you aware of this?  Yeah, me neither until I didn't have any time.  Our schedule is starting to normalize a bit so maybe I can get back to this soon. :)

Tuesday, February 28, 2012

Where I've Been

You may be wondering if I dropped off the face of the earth, but I assure you I have not.  Where have I been all this time?  Enjoying our newest family member.  That's right, I had a baby.  She is quite certainly the most wonderful and miraculous gift that I have ever received. 
I am in awe!
Now tell me, if you got to choose between staring at this gorgeous face all day or taking time to write a blog, which would you choose?
Obviously I've been staring away for the last 7 weeks.
She will start daycare soon and I might find a few minutes every once in a while to update you all as we get into a new routine.
See you around.
Until then feel free to stare at my little beauty.