Topics

Showing posts with label Recipes. Show all posts

Wednesday, December 28, 2011

Taco Soup

Ingredients:
1 box chicken broth
1 box beef broth
1 can diced tomatoes
1 can black eyed peas
1 can chopped green chiles
1c. frozen corn
1c. frozen peas
1c. chopped purple onion
1lb. ground beef
2-4 cloves garlic minced
2Tbsp. taco seasoning
1tsp. cumin
1tsp. chili powder
1tsp. celery salt
1Tbsp. olive oil

In skillet, saute onions, then add ground beef.  Put 1Tbsp. taco seasoning on meat, stir and brown.  Once brown stir in garlic and take off heat.  Put all ingredients in crock pot and cook on high for 4 hours.  Serve with grated cheese and tortilla chips. Serves 6-10, freezes beautifully.


Tuesday, October 11, 2011

Fried Rice

Sorry, no picture.  It got eaten before I thought about it, but really...you all know what fried rice looks like right?  Right.  So, here's how to make it at home.  It's really easy.

Ingredients;
1lb. chicken tenders (I pull the meat in bite size pieces off the tendon)
1Tbsp. olive oil
3c. minute rice
3c. water
1 stick butter
1 bag frozen stir-fry vegetables ( I prefer the ones with mostly snap peas)
salt/pepper to taste
1tsp. celery seed
1-2tsp. yellow curry powder
2-4 Tbsp. lite Soy sauce
1 egg (optional)

In a large skillet, drizzle with olive oil, put chicken pieces in, and stir with curry powder, celery seed, salt and pepper.  In a separate pot, cook your minute rice, or if you have a microwaveable rice cooker cook rice that way.  (If you don't have a microwave rice cooker, invest in one.  It's worth all $15.  It looks like a plastic version of a stew pot.  And it steams the rice really nicely.  You just put equal parts minute rice with equal parts water and cook about 5 minutes, then fluff with fork.)  When rice finishes set aside.  Cook chicken until done throughout, then add frozen veggies.  In separate non-stick skillet melt butter, and stir in rice.  Coat rice with melted butter and let cook 1-2 minutes.  Push rice aside to create a blank space where you can scramble your egg in the same pan, then when the egg is mostly cooked spread it through the rice.  Carefully add the chicken/veggie mix into the rice or vice versa and mix together really well.  If you are like me it's a little much to put in one skillet, so stir carefully as not to lose any to the floor.  Or, split it between the two skillets.  Add your soy sauce to the mix and stir well.  Serve and enjoy.  Serves 4-6 easily with hearty portions.  If you serve this with something else it could easily serve 6-8. 

This recipe stores well in the refrigerator for about 1 week, also freezes and reheats well if stored properly.  I like to use Ziploc Freezer bags with all the air squeezed out.  Just write the date on it so you know how long you've had it.

Note: If you like different veggies you can add whatever you'd like, the frozen bag just makes it easy and cheap.  The onion, mushroom, snap pea blend is great, so is the broccoli, water chestnut, snap pea, and pepper version.  I just get whatever sounds good.


Friday, September 9, 2011

Quesadilla Salad

This is one of our favorites, and it is so easy and healthy.  It's based off the Quesadilla Chicken Salad at Chile's.  We went out to eat this last weekend because we had family visiting, and couldn't remember the last time we'd actually been to a restaurant.  After thinking quite a while we realized it had been 11 months since we had been out to eat at a sit down restaurant!  That's almost an entire year!!  It has been a good thing though.  Part of the reason we haven't been out is because I try to make recipes at home similar to things we might order when we are out...and it works.  Plus, it's cheaper.  So enough chatter, here is my version of Chile's Quesadilla Salad;

Ingredients:
1 head of romaine lettuce roughly chopped (or 1 bag of Hearts of Romaine)
1 can black beans drained and heated through
1c. sweet corn(preferably frozen)
2-3 handfuls pre cooked chicken fajita meat (comes frozen in a bag, can also make from scratch)
1/4c. shredded cheese
peppercorn ranch dressing
honey mustard dressing
balsamic vinaigrette

To Make:
  • If using the convenient pre-cooked meat(which is REALY good), heat your meat in a skillet on low medium for about 10 minutes or until warm through.  If you want to make your meat, use tenders and season with just a touch of salt, pepper, cumin or taco seasoning, and maybe a tiny splash of worcestershire sauce. And cook through.
  • While meat is cooking, in separate sauce pans heat drained black beans and corn.  Do this in separate pans or the corn takes on some of the bean juice and turns a wierd grayish tint.  It still tastes fine, but isn't as appetizing to see on the plate.
  • Set up your plates;  Place a bed of lettuce, sprinkle corn and beans over it.  Then lightly sprinkle with cheese.  Next add your meat.  Now drizzle lightly a little of each dressing.  I use a butter knife dipped into the dressing to get a nice thin drizzle.  This is not a drenched in dressing type of salad. 
  • My also make cheese quesadillas to serve on the side.  This is how it comes @ the restaurant, but I don't do it at home because it's not necessary.  May also put tortilla strips on top if desired for extra flavor and crunch.
  • Serve and Enjoy! I always make the entire plate for each person, because you really need each component to get the best flavor, and if you let them choose they won't use all 3 dressings. There is no rule that says you can only use one. :)
Serves 2-5 (just add a little more chicken and lettuce for 3-5 people.  One bag of frozen chicken fajita meat is 5 servings, one bag of pre cut lettuce will make 3 salads.)


Monday, July 18, 2011

Taco Pizza

Ingredients:
1 can thin crust pizza dough
1/2c. Absolutely Picante Medium hot sauce
1/2lb. ground beef
1/2-1c. shredded cheese
1c. chopped fresh tomato
2c. shredded lettuce
small can sliced jalapenos
1clove garlic
2tsp. diced onion
dash of taco seasoning
salt/pepper to taste

To Make;

Preheat oven to 400 degrees Fahrenheit.  Roll out pizza dough on baking stone/cookie sheet and bake 5-6 minutes.  While that is baking brown ground beef in skillet with onion and garlic, salt/pepper, and taco seasoning.  When fully browned I like to shred it for more even texture in a food processor. Take crust out of oven.  Spread hot sauce/salsa over crust.  Then spread on 1/2 your cheese.  Next put on meat, tomatoes, and jalapenos and about 1/2 your lettuce.  Sprinkle the rest of your cheese on and put back in oven for 5-8 minutes.  Take out and put on the rest of your lettuce.  Cut into slices and serve.  Makes 12 pieces, serves 4-6.

Sunday, July 10, 2011

Best Biscuits Ever!

So...I had a hankering for some biscuits from Cracker Barrel, but getting them wasn't feasible. What to do?...make my own!  And...they are amazing!  Since I love them so much I immediately wrote it down, and then thought I should be nice and share it with you.

Ingredients;
2c. all purpose flour
3tsp. baking powder
1tsp. salt
1-2 tsp. granulated sugar
6Tbsp. butter (room temp)
3/4c. 2% milk

Mix dry ingredients together well with fork.  Then cut in the butter until crumbly and there are no really large chunks left.  Slowly stir in milk until just blended.  Do NOT over mix.  Do everything with a fork so you can feel that it is mixed.  Roll into rounds and place on greased baking sheet or baking stone.  Bake at 450 degrees Fahrenheit for 10 minutes.  You can bake slightly longer to brown, but they are fully cooked at 10min. Serve with butter and honey.  Makes about 12 medium biscuits or 16 small.

I WILL be making these again.  They are so easy and quick to make, and they taste better than any I've ever made.


Tuesday, June 14, 2011

Spicy Sausage Pasta

Ingredients;
1lb. hot sausage
1/2c. white wine
1pint heavy cream
1/4c. chopped onions
2 cloves garlic, minced or diced
angel hair pasta (and water to boil in)
Red Pepper flakes to taste
2Tbsp. olive oil
Small can of diced tomatoes
1/2c. shredded cheese-any blend will do.


 Saute your onions and garlic in a splash of olive oil on low heat.  Once translucent add red pepper flakes and white wine. Reduce down a bit.

 I don't have a picture of these so use your imagination.  Brown sausage in the mix above.    After sausage is browned and broken into bite size pieces, add some heavy cream and stir well until it cooks down just a smidge(it's a technical term).  Add drained diced tomatoes.


Boil your noodles separately. Drain noodles and combine into sauce.
 Finished in the pan...it's not really this orange. Add cheese and stir.
Sorry, it's blurry.  It was the best I could do.

Enjoy...and watch out; it's hot!  Good with a glass of milk.


Monday, May 16, 2011

Pink Stuff

Are you gearing up for summer yet?  Here is a great recipe that's good all year round, but especially when you need a cool treat in the summer.  And, it's easy!  Mom made this up when we were little, and we all still love it!  You can use any flavor gelatin mix, but strawberry or cherry is our favorite hence the name Pink Stuff, and yes we really call it that.
  My really runny version in a pretty bowl at Easter.

Ingredients;
1pkg. (8oz.) cool whip*
1pkg. (3oz.) strawberry powdered gelatin mix
1 small 12-16oz. tub cottage cheese**
1c. fresh strawberries diced (optional)

Simply mix all ingredients together really well and serve cold, eat it with a spoon.  It's that easy. Serves: A Lot!  You can freeze it too for an ice-cream like treat.

*I usually like to use whipping cream to make my own whipped cream, and it works for this but it's much runnier.  CoolWhip actually does work better.
**If you or your children don't like the texture of cottage cheese, simply throw it in the blender for a few seconds until it's well blended.  It becomes really creamy and you'd never know what it was. 


Make sure you get all the gelatin mixed in really well or you have powdery swirls when you scrape the bottom to pour it into your serving bowl like this;
 
 This large serving bowl used 1 pint of whipping cream and 1c. sugar (to make the whipped cream), 24oz. cottage cheese (creamed in the blender), 1 small pkg Cherry Jello brand gelatin mix and about 2c. frozen strawberries chopped. When I say large; it's about the same size as my KitchenAid Mixer Bowl.  Again, it freezes REALLY well. :)


Friday, May 6, 2011

How do you Cook?

Do you have a shelf like this?
It's where I keep my recipe books...all 30 of them.
And yes, we have several editions of the Better Homes and Garden Cook Book.  I think we had one or two more, but they may have been given away.

Well I do.  But I've only visited that shelf maybe 10 times in the last 5 years.  And even then I don't think I've actually followed any of the recipes.  But why?  Well, you see...I'm not good at following recipes.  Every time I think I will, I still end up deviating a great deal, so I never really know what all those great recipes are supposed to taste like.  It usually ends up great, but never like the recipe.  Do you cook like this too?  Is this completely bizarre?

I've decided I need to reference these books more often.  I mean...do you see all those titles?  Those are some great books, by amazing cooks/chefs, with some awesome concoctions!  I'm going to try.  We'll see what happens.  I think if I had a big kitchen, with plenty of counter space and cabinet space and pantry space, then maybe I would also have a place to show these books.  You know; a place where I'd actually SEE them, so I might be compelled to USE them, even if just for ideas or reference.  But, I don't have a big kitchen.  I have a kitchen that is big enough for my butt and mine alone.  It works well, but there is definitely not much counter space, or cabinet space, or pantry space.  And there is by NO means any space for displaying these lovely cookbooks.  So the books are hidden in the media room, which is actually a horrible place for them because that's also the room where the dogs stay when the weather is bad.  I have to dust a book thoroughly before it gets used, ESPECIALLY if it's going anywhere near my kitchen or my food!  And I love my books...it makes me sad.  But, that's just how it is.


Monday, April 25, 2011

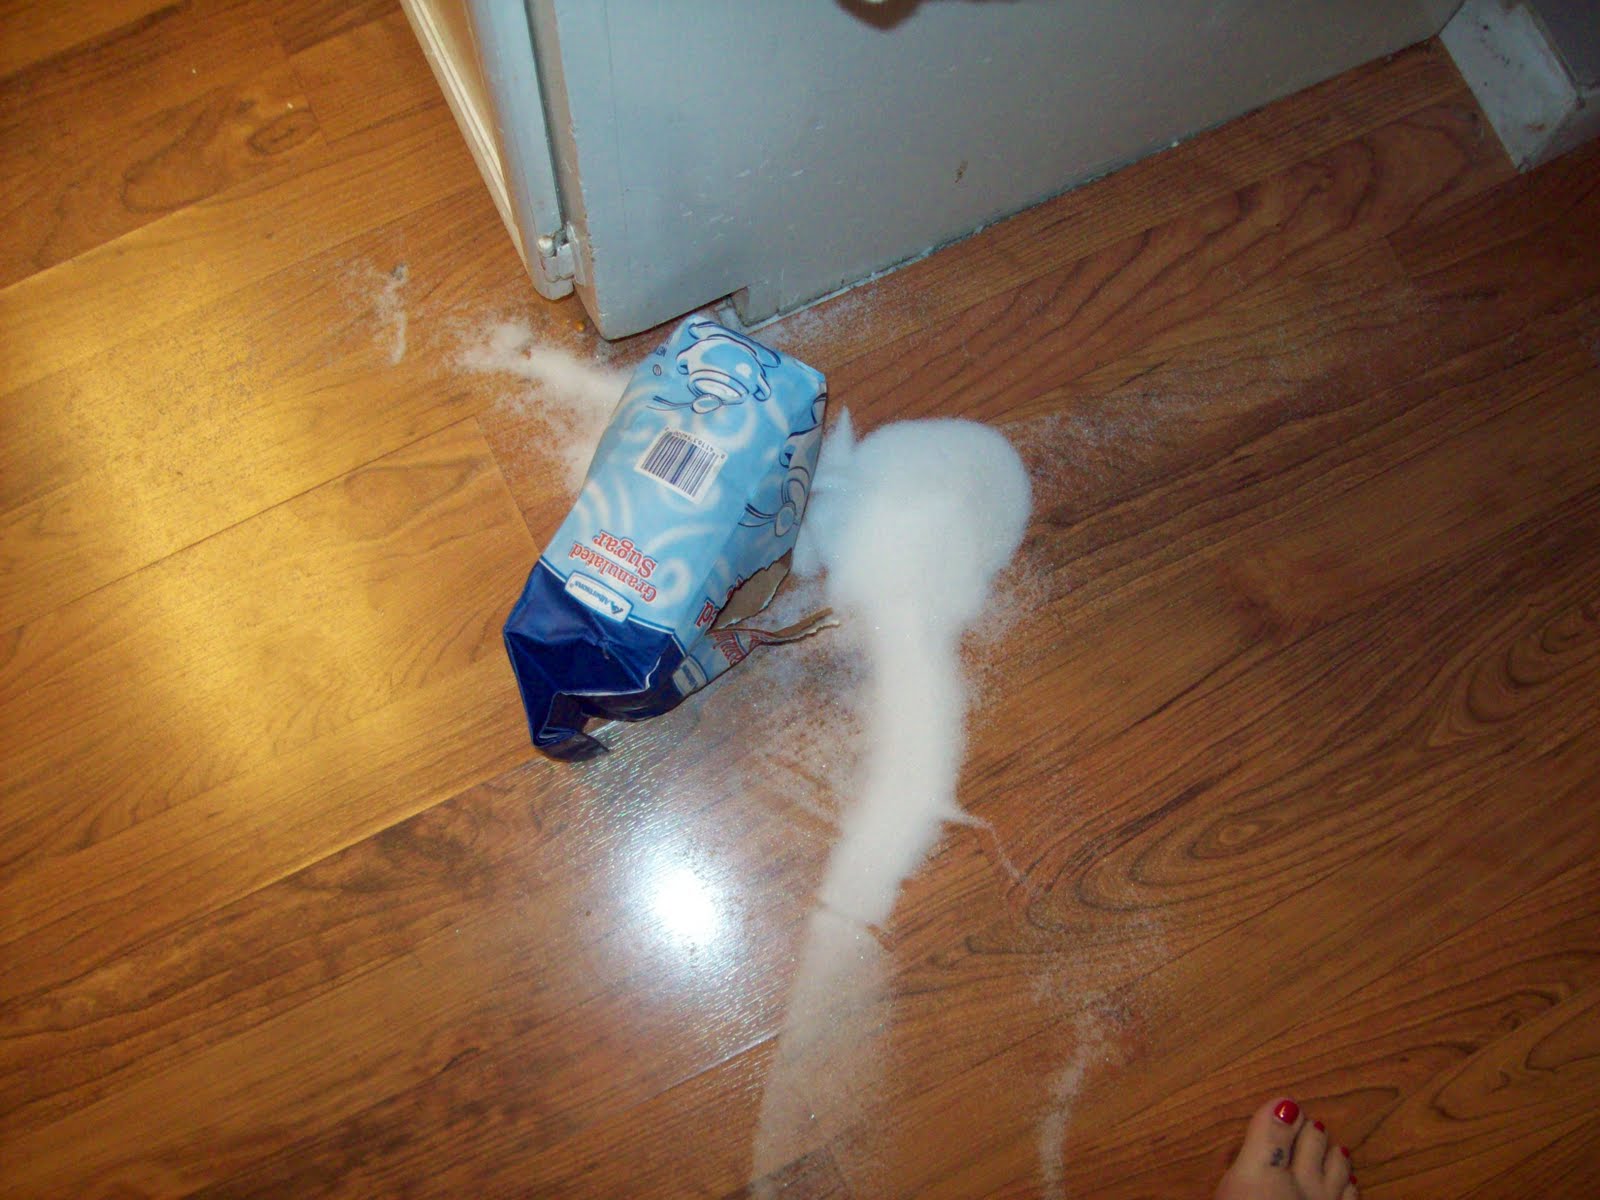
So this happened

 What is this you ask?  Well, it's a brand new bag of sugar that fell off my counter onto my clean floor and busted open just as I was about to transfer it to it's appropriate container.  And yes, I was barefooted.  I am always sans shoes at home.  Sugar on bare feet is uncomfortable!  It was a horrible mess, at least half the bag went out onto the floor. 
Note: The Dyson Vacuum works wonders. 


On a happier note;
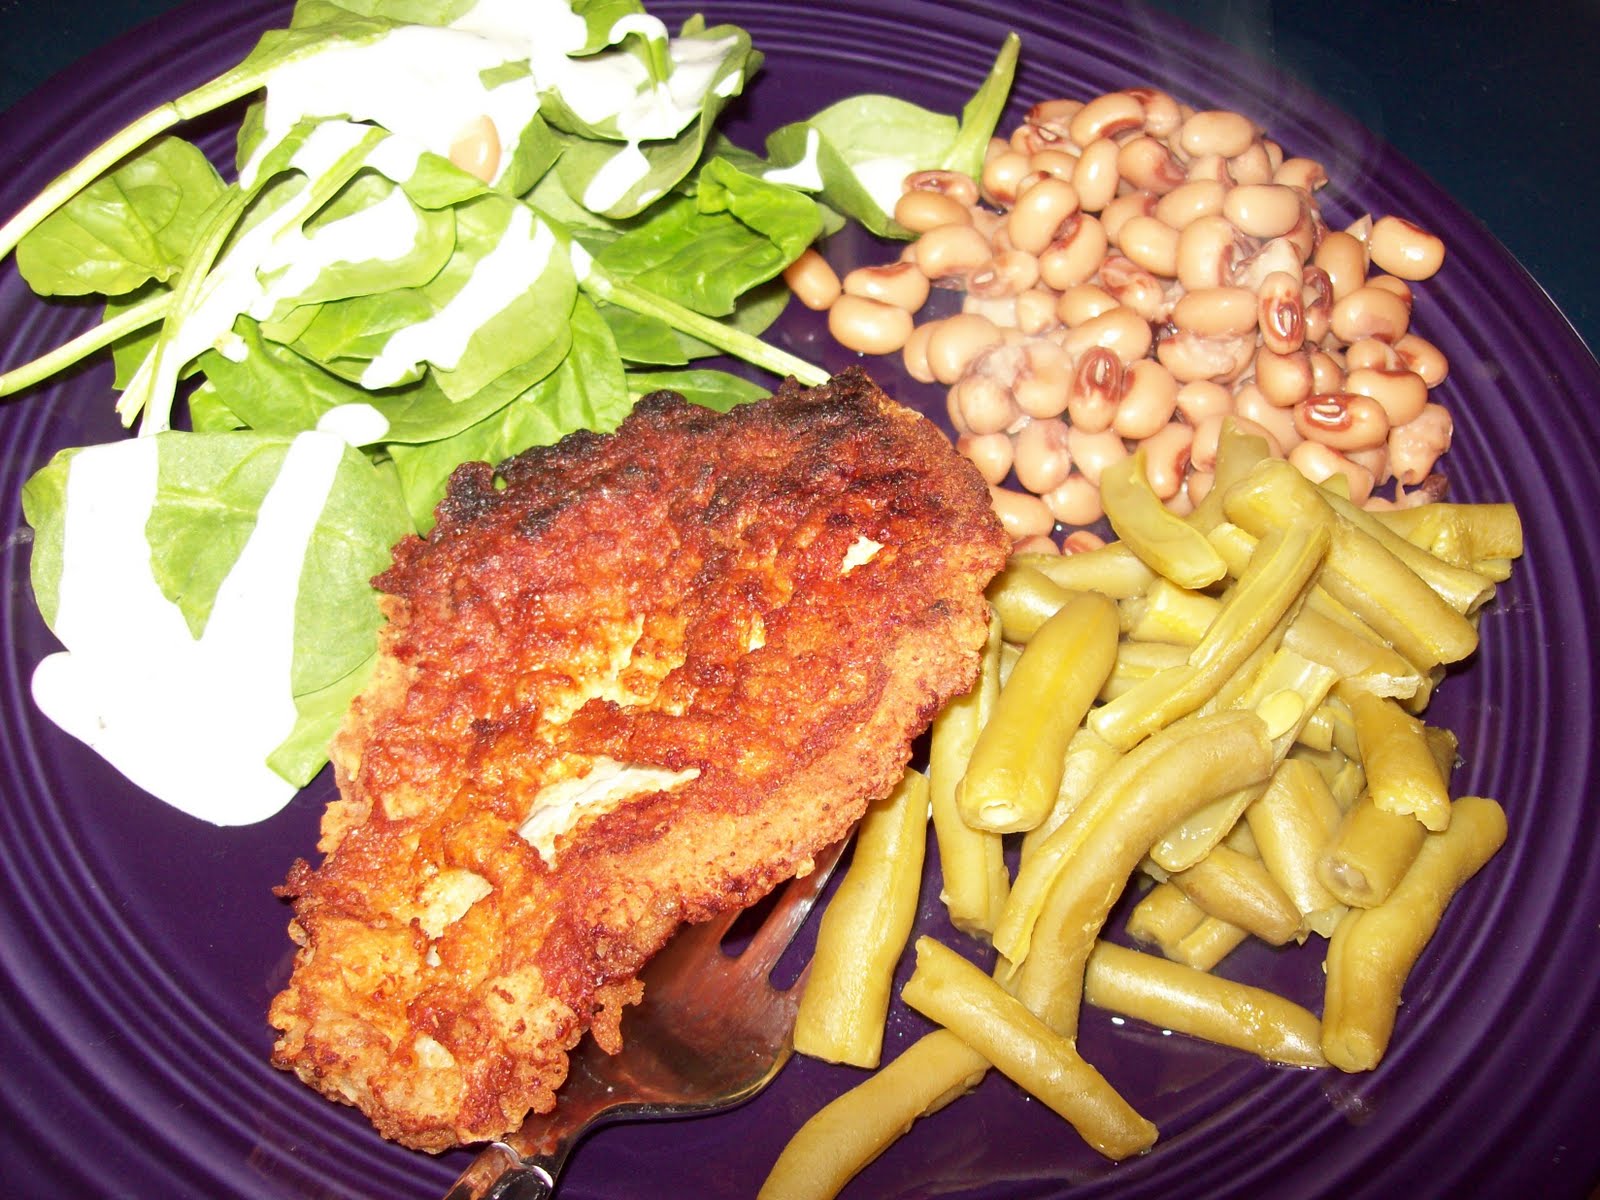
I made pork chops for the very first time.  No recipe, just wanted a 'mom' meal(something my mom made for us growing up that I haven't had in forever).  I have to say it turned out awesome, and even my husband who doesn't care for pork loved it!  He also informed me I had confused his digestive system at creating such a complete meal on any day/time other than Sunday lunch.  Usually I make one trick meals...where most everything is in one dish.  This was a HUGE treat for us in the middle of the week. Yay me.  He even said I could fix it again; not very often, but again.
How I made it;
*Ingredients;
Pork Chops, no bone, slightly tenderized.  I got the really thin ones. 
1c. flour
1-2 eggs slightly beaten
1-2Tbsp. Lawry's seasoned salt
1tsp. ground black pepper
1/2-1tsp. cayenne pepper
1/4-1/2c. vegetable oil

Mix dry ingredients really well.  Dip chops into egg, then dry mix.  Cook in hot oil on stove for 6-8 minutes per side.  Serve with spinach salad, green beans, and black eyed peas.  If you wanna. :)
They still needed a knife to cut, but they weren't too tough to chew.  I think I'll tenderize a bit more next time.


* The package of chops I bought came with 5 in the pack.  Adjust ingredients according to how many chops you are fixing.

Monday, April 11, 2011

Tequila Lime Fajitas

I'm ready for lighter flavors and fresh vegetables.  So, this weekend I made Tequila Lime Shrimp and Chicken Fajitas.  Yum!  I thought you all might be looking for some fresh dinner ideas too, so I'm sharing.
*Sorry I don't have a picture.  I wasn't thinking fast enough, and we were really hungry so they disappeared pretty quick.*


Serves 4
Ingredients;
For the meat;
1lb. chicken tenders or shrimp(de-veined and de-tailed)
1/4-1/2c. gold tequila**
2-3 fresh limes, or 2Tbsp. lime juice
1tbsp. olive oil
1-2tsp. Worcestershire sauce
salt and pepper to taste

Other;
8-10 Flour tortillas
1 Large Green Bell Pepper Sliced Thin
2 Large Red Bell Peppers Sliced Thin
1/2-1 Large Sweet Onion Sliced Thin
1/2-1 Tbsp. olive oil
1-2 tsp. Worcestershire sauce
salt and pepper to taste
Shredded Cheese and Sour Cream

Start by marinating meat.  To prepare the chicken, let soak in tequila and lime juice for about 1-2 hours in a covered dish or sealed freezer bag.  For the shrimp only do this about 15-30 minutes; it's more delicate.  Both meats will become slightly cooked from the acid in the lime juice, but you still need to cook through on the griddle or skillet.

When you are ready to cook, start with peppers because they take the longest to cook.  Put pepper strips on griddle with a little olive oil and let cook at 250 degrees Fahrenheit, or medium heat for 10 minutes.  Then add onion strips and Worcestershire sauce.  Let cook until very limp.  Move them around on griddle with tongs so they get some color but don't burn.  Add salt and pepper if desired.  Move pepper and onion mix to the side in a glass bowl.
Take meat out of container and put on griddle or skillet(throw out the juice) with olive oil and Worcestershire sauce.  Let cook until done, about 5-10 minutes.  I like to let my chicken get really brown on the griddle.

Serve in tortillas with cheese and sour cream.  Enjoy.  Can also sprinkle some extra lime juice on top and add guacamole.


**I used Jose Cuervo Gold.  It has a great flavor for cooking.  If you don't keep alcohol in the house just do these without it.  They are still good with just the lime juice, or you can soak them in orange juice.


Friday, April 8, 2011

Do you know about this?

So, all my life I've heard people talk about this product.  My husband talks about having grown up eating this on peanut butter sandwiches regularly.  I finally broke down and bought a jar. 


Marshmallow Creme

First I tried it in a recipe, and the recipe turned out pretty good, but I still didn't really know what all the hype was because it pretty much acted just like melted marshmallows...without the mess and cleanup...which is worth it.
So then I bought another jar and tried some on a peanut butter sandwich.  It was okay...but nothing special.  So then I thought I'd break down and just dip my finger in to see what they hype was about.  I couldn't believe my mouth.  It's AMAZING!!!!!  Pretty sure I ate a spoonful (much to my husband's chagrin) right out of the jar after that.  Then the closed jar fell in the trash can.  Several times.  I think somebody was trying to tell me something, but I also think this will now be a staple at our house.

Monday, April 4, 2011

Coconut Shrimp

Servings; 2
Ingredients; 
1lb. shrimp (frozen or fresh, both work well)
1/2 c. all purpose flour or biscuit mix
2 eggs (whisked)
1/2 c. coconut flakes
1/2 c. panko bread crumbs
orange marmalade

To make;
If using frozen shrimp, thaw under running water, pat dry.  For fresh, rinse quickly under running water and pat dry.  Place flour and eggs into separate shallow bowls.  Mix bread crumbs with coconut flakes, and put into another shallow bowl.  Dip shrimp in flour, 3-4 at a time, coat well. Then dip into egg wash, letting the excess drip off.  Move to bread crumb mixture, and press crumbs and coconut into shrimp until well coated.  Place onto greased cookie sheet.  Continue this process until all shrimp are coated.  Bake on middle rack at 350 degrees Fahrenheit for about 30 minutes, or until coconut is lightly toasted and shrimp is cooked through.

Serve with marmalade and enjoy.

Note: This is a VERY messy process, and you will need to rinse your hands repeatedly.  I try to use one hand for wet, one hand for dry, but eventually they both get icky.  Just rinse your hands and keep going. 

Portabello Pesto Wrapini

Well, I think my body knows it's spring...I'm ready for fresh vegetables!  So, here is something new on our menu; the Portabello Pesto Wrapini (similar to something on the Jason's Deli menu).  It is easy, filling, and nutritious.
Servings: 2-4
I say it can be 2 servings if you don't add any side items, but if you serve some fresh fruit with it it could easily serve 4 people, if they are the kind of people who can turn down food even though it's difficult to resist one more bite.
Ingredients;
1pkg. Portabello Mushroom Heads (they are packaged in 2's)
2 Garlic Herb Wraps (Mission Brand is great, come in packs of 10)
2-3 Tbsp. pesto sauce (I use Biutoni)
1/2c. alfalfa sprouts
4 slices Provolone Cheese
1 cup fresh spinach leaves
1Tbs. olive oil
fresh ground salt and pepper to taste


To Make;
I set my stovetop griddle* to 250-275 degrees Farenheit.  Place mushroom heads on griddle (gill side up) and drizzle with olive oil and salt/pepper.  Very little oil should be on the griddle, just a few small drops.  Turn after a few minutes, then slice mushrooms in long strips about 1/2" thick after 5-7 minutes cooking.  Let cook about 10-15 minutes, turning occasionally, until tender and cooked through.   Put on paper towel to rest.  Place wraps on griddle to heat about 5-10 seconds on ONE SIDE ONLY.  Remove and place the heated side up on your plates.  Doing so keeps the messy bit to a minimum.  Heat Pesto slightly in microwave about 30 seconds to 1 minute.  Spread about 1/2-1 Tbsp. Pesto on each wrap, straight down the middle.  Then place your cheese, sprouts, and spinach.  Lastly put mushroom slices on wrap.  Fold two sides in and roll (look at instructions on wrap package).  Place rolled wrap back on griddle, and put heavy pan on top to flatten slightly.  Grill for about 1-2 minutes either side to let it crisp slightly.  Place on plate and cut in half to serve.  Enjoy!  Goes great with fresh fruit or orange juice.

*Can be done in skillet as well, but using the griddle gives more space for heating the wraps.

Saturday, January 1, 2011

Insulated Casserole Carrier

 This is a tutorial...not a good one, but it is one.  If you like it, I'm glad, if you can do it better please help me.  I decided I needed to make this but couldn't find a good tutorial online, so I thought I'd try to track my progress and share it with you.
 This is insul-bright.  It's what you need.  I got it for about $2.50 a yard, you'll need one yard for a 9"x13" casserole dish.  You may want about a yard of regular batting also.  I didn't use it, but I probably will on the next one.
 I used my dish as a template, and cut my insulation three times the width plus 2x the depth, and a little. Then I cut it about 1/2"-1" more than the length.  So, it is roughly 32"x 14".
 Cutting it this way gives you enough to fold it across your casserole twice.
 Voila!
 Cut two pieces of fabric in the same manner.  Sew right sides together leaving about 10" open in the middle on both sides. You are sewing the first and last third of the length and across each end.  The middle bits are where your cross panels will go.  I pinned mine so I'd know where to stop.
 You end up with two openings opposite each other in the middle of your fabric.
 Pull the fabric through one of the openings, and us a pencil to push out your corners.
 This is me trying to show you that my arm is going through the middle of the pocket, but I have short arms so you can't even see what I'm doing.  But look at that gorgeous fabric!  It's very important to iron it flat after this.  It will make putting everything together much easier. 
 Next you will cut four pieces of fabric the length of your casserole (13") to use as side panels.  You might also want to use two layers of batting without the insul-bright for these as well. Sew them right sides together leaving a small opening where you can turn them out.  Insert your batting, get it to lay flat, and then stitch it closed.  I did this at the 'bottom' of the panels because they will be inserted into your large panel that you made first and the stitching won't be seen.
 Now, insert your insul-bright and batting if you are using it, into the large panel, and straighten it out.  Then, without sewing it up, insert your side panels and pin together with the seam folded under. 
 See this? This is what you have to do.  Trust me, pinning is the best thing to do.  Now, carefully using a zigzag stitch, stitch the layers together, closing up your side openings.  I quilted a simple diagonal from corner to corner on each panel, and then a straight line where the panel will fold up and over the casserole dish to make it a little sturdier.
 You now have this.  I added a double button and button holes to keep everything closed, and with the double button, it's fully reversible.
Put your dish inside and be proud of what you've accomplished!  Now if only I could figure out how to make one of the really nifty ones with handles...maybe I'll try that next.

Monday, December 20, 2010

Jalapeno Corn


Jalapeno Corn

2-6 cans shoepeg corn or 1 bag frozen corn
1/4 cup milk
1 stick butter (1/4 lb)
2 small bars cream cheese(start with one)
2 dashes garlic salt or powder
1/4 cup water
2-4 Jalapenos minced
In medium sauce pot, melt butter and add cream cheese. Melt well. When melted, mix in dashes of garlic, 1/4 cup of milk, 1/4 cup water and corn; mix well.  If mixture is too thick ad water or milk to thin down, if too thin add second bar of cream cheese.
Mince jalapenos and add to taste. The more jalapenos, the hotter the mixture. Pour into a baking dish and bake at 350F until very light brown and bubbly. Serve hot.
Serves 6-12

*Can also add 1 Tbsp. minced onion and garlic instead of powder.

Saturday, December 4, 2010

Tuna Salad

I know everyone has their own tried and true recipe for tuna salad, but have always loved the way my dad makes it, so I thought I'd share our recipe with you. 
Ingredients;
2 large cans tuna in water(drained)
2 Tbs. finely chopped sweet or purple onions
1-2 roma tomatoes diced
2-3 Tbs. sweet relish
2 Tbs. (10-20 slices)dill pickle slices(finely chopped)
1 tsp. celery salt
3 Tbs. mayonaise
2-3 tsp. yellow mustard
2-3 tsp. ranch dressing
3-4 hard boiled eggs chopped

Mix all ingredients together, chill, and serve on your favorite bread as sandwiches. Serves 4-6.  Adjust mayo, mustard, and ranch according to taste.

Saturday, November 20, 2010

Broccoli Casserole

Getting ready for the holidays...can you tell?
See Green bean casserole recipe because we'll be doing the same thing here.
The substitutions are;
1. instead of bacon we'll use a can of chopped green chiles
2. Instead of green beans we use broccoli.
3. Add 6 cups cooked rice.
Follow the same instructions, but you will want to transfer everything to a large mixing bowl to incorporate cooked rice and broccoli with the 'gravy' mixture.  Place into medium/large baking dish and bake 30 minutes at 350 degrees Fahrenheit.

Due to the similar nature of these recipes it is easy to make them simultaneously.

Green Bean Casserole

Ingredients;

2 Tbsp. olive oil
1/4c. chopped onions
2 cloves garlic chopped
1/2 package bacon chopped
1/4c. finely chopped mushrooms
4 Tbsp. butter
2 Tbsp. flour
1-2 c. milk
1/2-1c. heavy cream
1c. shredded mexican blend cheese
1/2c. shredded parmesan
salt and pepper to taste
4c. green beans
1c. panko bread crumbs

In a  large skillet sweat onions in olive oil.  When translucent, add in chopped bacon, garlic, and mushrooms.  When bacon in mostly cooked, but still soft move mixture to a bowl.  In same skillet melt butter and stir in flour.  Mix flour with butter until incorporated, then add milk and cream.  Stir well until mixture becomes almost as thick as gravy.  Add in salt and pepper.  Stir in onion and bacon mixture.  Add in cheese and stir until just melted.  Mix in green beans and transfer to small/medium butter coated baking dish.  Sprinkle with bread crumbs and bake at 350 degrees Fahrenheit for 30 minutes.  Enjoy!

***This is not one to be reheated as leftovers.  It is best when hot out of the oven.

Wednesday, September 22, 2010

Cranberry Muffin Surprise

Ingredients;
2 c. flour
1/2 c. brown sugar
1/4 c. granulated sugar
1 tsp. baking powder
1 tsp. salt
1 tsp. cinnamon
1/2 tsp. nutmeg
2 dashes each clove and ginger
1/2 c. softened butter
1 c. milk or cream
1/2 c. orange juice
2 tsp. vanilla
1 egg
1 c. frozen cranberries
3-4 Tbsp. Nutella

Combine all except cranberries.  Mix until well combined.  Stir in cranberries.  Fill muffin tins two thirds full, making sure to get a few cranberries in each cup.  Bake for 30 minutes(or until toothpick comes out clean) at 350 degrees Fahrenheit.  These do not puff up above the level they are filled.  If tin is filled to top the batter will run over the top to create a flat edge(makes it difficult to remove without crumbling).  Makes 4 dozen mini muffins or about 2 dozen regular muffins.

Wednesday, September 15, 2010

Family Wine

We recently learned about some family owned vineyards who send their grapes to Becker Vineyard.  We've always enjoyed Becker's wines and learned that we'd had several bottles of the Claret from the one family member's vineyard.  We recently purchased this reserve bottle from the other vineyard because we thought it would be great just to have.  I'm excited to try it, but it's not a bottle you open just because.  It needs a special occasion.  We thought we'd have it for our anniversary this year, but that was interrupted by the U.S. Open Men's Tennis Final.  Although entertaining, it was not exactly what I thought would be the focus of our anniversary.  So, for now it's sitting pretty on our buffet in the dining room.